Friday, June 28, 2019

Monday, June 10, 2019
Friday, January 18, 2019
Tuesday, January 1, 2019
Monday, November 12, 2018
Wednesday, October 24, 2018
Thursday, September 6, 2018
Monday, August 13, 2018
Glam, Good, or Gross?
Glam, Good, or Gross?


Shades:
Nudist Peach
Satin Sheets
Nudie
Patootie
Video Vixen
Missy and Fierce
Oh My Dolly
Pink Really Hard
Nudist Peach
Satin Sheets
Nudie
Patootie
Video Vixen
Missy and Fierce
Oh My Dolly
Pink Really Hard
(Shades Left to Right: Nudie Patootie, Satin Sheets, Nudist Peach, Pink Really Hard, Oh My Dolly, Missy and Fierce, Video Vixen.
Wet n' Wild Catsuit Liquid Lipsticks!
Amount: 0.21 oz
Pros: The lipsticks are very pigmented, long wearing, comfortable, and the shade range is great! The price is also a very big win! I find the applicator to be very easy to use allowing for precise lines.

Cons: The shade Nudie Patootie and Video Vixen need two layers to be completely full coverage. The dry time is not as quick as I would like it takes about 5 minutes for these to completely dry down.
Verdict: For the price these are definitely Glam! I don't see how anyone could disagree. They are not too trying, they last a long time! Even through eating Pizza! They do not transfer while you eat or smudge. Once they dry they are pretty much budge proof. The shade range is enormous even including blues, purples, greens, and blacks for those who are adventurous. If you are looking for an affordable liquid lipsticks, there is no better option! I highly recommend them! I prefer them over my Stila Liquid lips if that says anything!
.
Tips: Shake before use! Store upright!
Monday, August 6, 2018
*ABH* Soft Glam/ Prism Tutorial ! Gold Sultry Eye

First I took the Wet n Wild defining brow pencil and the Maybelline Brow Precise pencil and filled in the brow. Then taking Tarte shape tape and an Asthetica angled brushed, I carved out the brow. I then followed that by applying the Luara Mercier eye base.

Then taking the ABH Prism Pallete I used the shade unity to set the entire lid. After setting the lid i took the shade Saturn and applied it with the Wet n' Wild blending brush to my crease as a transition shade.

Then taking the shade Senna from the ABH Soft Glam, using the same brush after using a color switch, I went directly over the previous shade to deepen it up. Taking a small pencil brush I toto th e shade Cyprus Umber and darkened the crease.

Then using a Morphie smaller blending brush i darkened up the the outer V of the crease with the shade Noir. Placing the majority of the color in the outer V and slow dragging the remaining color into the crease without blending upwards.

Taking a flat packer brush and the color Bronze and applied it to the inner 3/4 of the lid leaving the outer section black. Taking a very small shading brush and a very small amount of Noir, then blending the transition from Gold to Black with soft motions whilst deeping up the outer corner yet again.

Optinal step: apply over the gold shadow Still Magnificent Metals in Gold Godess. Apply a winged liner with a liner of your choice, I used Pretty Vulgar.

After completing the upper portion of the eyelid, I then primed my face with the Too Faced Hangover RX primer ( which is awesome for dry skin!) and then used the Wet N Wild PhotoFocus Foundation in shade Porcelain to my face using a beauty blender ( I recommend working fast with this as it sets very quickly, full review to come. Also stay tuned for a battle of the foundations!).

I then went back into the Tarte Shape Tape and applied it to the points of my face I like to highlight ( I applied way to much at first!), blended that out, and set it with the Laura Mercier Loose Powder.

Returning to the eyes as I let my skin " bake" . In the ABH Prism Palette I picked up the shade Sphinx on a small tapered brush i applied this shade under the entire lower lash-line for a pop of color. I then used the Jonteblue eyeliner in a Charcoal on the lower water line.

Then Taking the ABH Moonchild highlight kit and the shade Lucky Clover I applied it ot the inner tear duct portion of my eye. I then curled my lashes and applied the Hello Lashes from It Cosmetics.

I then applied some false lashes .

After removing the baking powder, I used my Cheek-A-Boom Palette and the Hoola light to contour my face and my nose. I took the Tarte 12 hour Amazonian Clay Blush in Paaarty! and applied it to the apples of my cheeks blending it in with my contour.

Using the same shade of Lucky Clover and I applied to the cheeks, brow bone, and the bridge of the nose. I used a nude shade of lipstick and lip liner and applied it to the lips.

Finished Look!

Tuesday, December 19, 2017
Simple Christmas Look

Products Used:
Face: Mac Studio Fix Fluid , Tarte Shape Tape, ABH Cream Contour Kit, Laura Mercier Translucent Setting Powder, MUFE Face Color S214, ABH Ultimate Glow Kit, Wet N' Wild Contour Kit in Dulche De Leche
Eye Brows: It Cosmetics Brow Power Super Skinny, ABH Clear Brow Gel
Lips: Tarte Tartest Lip Paint in Birthday Suit, Sephora Collection Ultra Shine Lip Gel 04: Perfect Nude
Eye Base: Laura Mercier Eye shadow Primer

To start the look off I primed the eyes.
I then took a fluffy brush and applied Divinity from the Too Faced Chocolate Bon Bon shadow to the entire lid.
The I took the shade almond Truffle and applied it to the crease.

Then taking the shade Bordeaux on a fluffy blending brush I applied it over our transition color.
Taking the same brush and the ABH Prismatic Palette and the shade Parallel I applied it to the outer corner of the eye blending towards the crease.

Then taking a flat shader brush and MAC Fix + I took the shade Throne from the ABH Prismatic Palette. I applied that in the outer portion of the lid.
Then Dipping into the shade He Devil from the Naked Heat Palette. I blended out the green shade.

After blending out the shades....
The green is hard to blend!
Then taking another flat shader brush I dipped into the shade Sphinx and placed in on the middle portion of the lid.

Taking another shader I applied the shade Pyramid from the same palette to the inner portion of the lid and corner.
After ages of blending.....
I applied the Kat Von D Tattoo Linger in Trooper to the lid. I used the Tarte Shape Tape concealer to sharpen the wing.

I applied the It Cosmetics Super Hero Mascara.
The face makeup up was finished.
I highlighted the brow bone with the highlighter mentioned in the description
Thursday, December 14, 2017
Beauty Blender VS Miracle Complexion Sponge (Face Makeup for Candy Cane Post) ;)
Real Techniques Left Side of the Face and Beauty Blender Right Side of the Face


First I applied the Becca First Light Priming Filter all over the face.
Then I used the RT sponge to do the left side of the face and the BB to do the right side of the face.
The concealer I used for my eye primer and to carve out my brows. It is not pictured though. If you are interested in the eye-makeup. Check out the Candy Cane Makeup Tutorial!

The Ready Set Gorgeous Foundation was applied all over the face. Left side RT. Right side BB.
Then taking a small stippling brush I applied the lightest shade of contour to my the hollows of my checks and forehead.
Then taking a clean brush I applied the shade on the bottom right to the places I would highlight.
Then I blended each side with their corresponding sponge.

After applying a the Laura Mercier Translucent setting powder with a fluffy brush.
I then applied the Wet n Wild Contour Palette in the shade Dulche De Leche in 3 shape on my face.
After blending it out with a flat face brush I went into the Tarte Holiday Blush Palette ( I recommend buying this !) and applied the shade fortunate to the apples of my checks and blended it into my bronzer

Then taking a small highlighting I applied the Essence Pure Nude highlighter in shad 02 to my cheeks, nose, upper lip, and temples.

You can stop with the highlight at the Pure Nude highlight if you want.
I didn't think it was pigmented enough though, so I applied the Cover FX highlighting drops with the micro BB and micro RT sponge to the same area.
The shade is Moon Stone.

The eye-makeup was finished.
I applied NARS Red Square Velvet Matte Lip Pencil as a liner, then the NYX Liquid Suede in Kitten Heels, and finally I topped it with a the Estee edit flash effect lip gloss.
Verdict : I personally prefer the BB over the RT sponge, because the BB provides a smoother coverage. The RT sponge however is a very close dupe. If you can't or just don't want to drop the $20 dollars for the BB the RT sponge is a great duplicate at a great cost. Save your money on the BB micro blender though, the RT micro actually preforms better in my opinion.
Can you spot a difference?
Candy Cane Christmas Look
The Look:

 Step One: Apply your brows (feel free to do this how you please). For my brows I use the It cosmetics Brow Power Super Skinny. I first fill in the sparce areas. Then taking the Tarte Shape Tape I carve out my brows.

Blend out the concealer and use a brow brush to comb through the hairs for a more natural look. I then went into the new ABH Prismatic palette. I used the shade Unity and applied it to the entire eyelid with a fluffy brush.

Then using the Huda Beauty Dessert Dusk Palette using the shade Musk I applied it to my crease with a fluffy brush. Then using the same brush I went into the shade Eden and placed that on top.

The first picture in this collage is after applying the shade Eden to the crease. Then taking a clean brush, that is the same as the one pictured. Taking the fluffy brush, tapping of the excess apply OUD to the outer corner of the eye as pictured.

Be sure to blend in a circular motion. Then taking a flat shader brush I picked up the color cashmere and applied it to the lid.
The next products used are the Wet n' Wild Megaliner in White and a the Urban Decay Full Spectrum Palette the shade Bump.
You can use whatever white eye shadow or eyeliner that you have though to achieve a similar effect.

Apply the white as winged liner and then top it with the white shadow to prevent it from smudging.
Then I took the NYX liquid lipstick and fine brush and applied stripes.
Then going into the Stila Glitter & Glow Liquid eye shadow in the shade Diamond Dust and the fine tipped paint brush. Then I applied the glitter over top.

After the eyeliner was applied, I cleaned up the edges with the Tarte Shape Tape shown previously.
Below is the foundation I used.

The Mascara used is the IT Cosmetics Superhero.
I applied the rest of my face makeup. (See the Beauty Blender v.s. Real Techniques Miracle Sponge Post for details on the face).
Finished LOOK!

Stay Beautiful!
Saturday, September 9, 2017


Saturday, September 2, 2017
Dupe it or Ditch It!
Benefit Hoola vs Wet N' Wild

Hoola VS Dulce De Leche
Price: $29.99 $4.99
Amount: 0.28 oz 0.22 oz
Verdict: Dupe! They are practically identical! If you can get your hands on the Wet n' Wild give it a try!
Swatched: Hoola on top. Wet n' Wild on bottom.

Wednesday, August 30, 2017
Dupe it or Ditch it!
BenefitGalifornia vs Hard Candy Fox in a Box Skinny Dipping
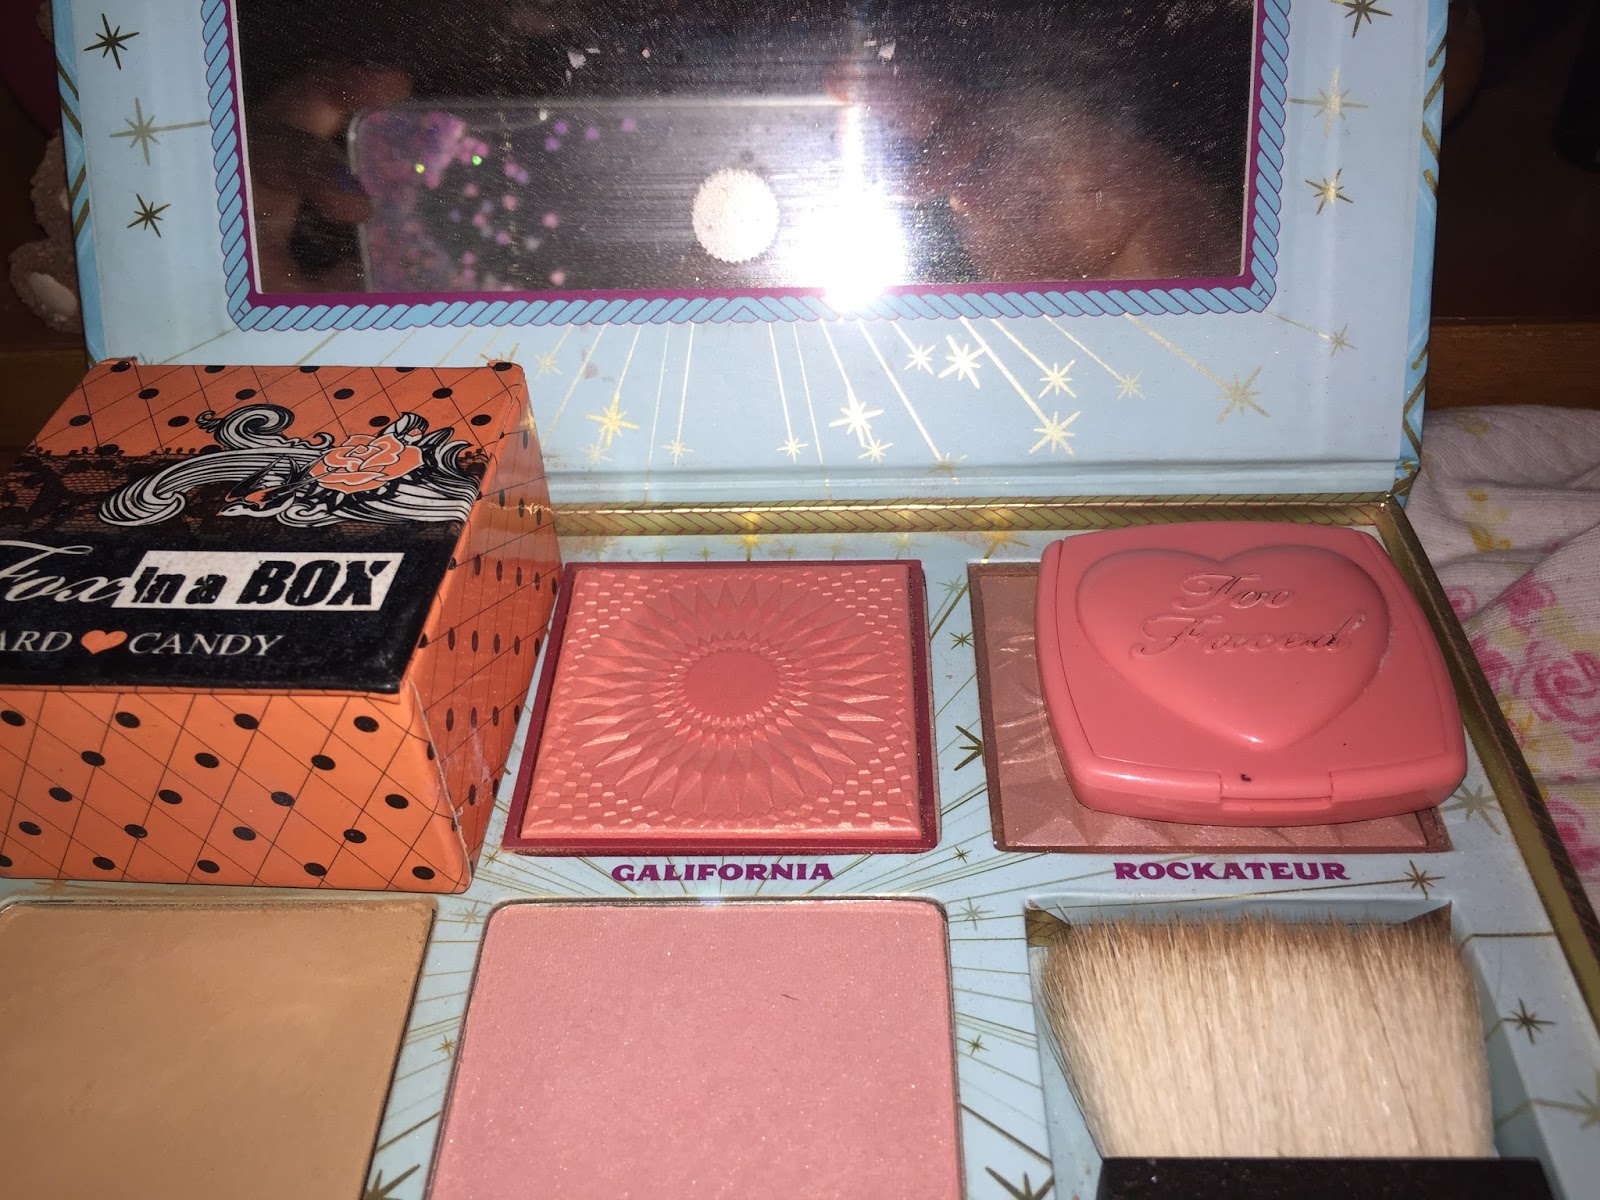
Galifornia Skinny Dipping
Price: $29.00 $9.99
Amount: 0.17 oz 0.2 oz
Verdict: Dupe! Highly recommend skipping out on Galifornia and getting Skinny Dipping. One it doesn't have a smell. The hard candy is also more pigmented! As an added bonus you get more product for less than a third of the price. You can get hard candy at Walmart and online.
Swatch: Galifornia Top Skinny Dipping Bottom

Friday, August 25, 2017
Too Faced Bon Bon Palette Tutorial

First apply an eyeshadow base and a flesh toned eyeshadow.

Apply the shade pecan praline to the crease. Then go in with a fluffy brush and apply Totally Fetch.

Apply a dark brown shade to the crease with a pencil brush. Optional: Take a darker pink shade to run with a pencil brush just in the crease.

Take a concealer and carve out the eyelid. Then take the shade sprinkles on top of the concealer.

Take a pink glitter ( UD Moondust Specter) and apply it on top of the pink.. Then take a dark pink/purple and apply it directly in the crease to redefine. ( I use tape for a sharp line.

Apply liner and remove the tape. apply Primer and clean up the eye with concealer. 

Do your brows and clean up. Apply foundation and blend out.

Clean up under the brows with a skin toned powder.

Contour and conceal.....

Bake and powder contour.

Take the pink on a tiny pencil brush and run under the lower lash line. Apply blush on the cheeks after removing the baking powder.

Apply glitter to the inner corner of the eye and mascara.

Apply a white eyeliner to the waterline of the eye.

Apply Highlighter....( Wet n' Wild I don't know the exact shade but it's something canopy). and a lip color ( I used Melted Peony).

Subscribe to:
Posts (Atom)